Using A Reflector for Interior Photography


Reflector blocking light

In a previous post, I wrote about using black flags in interior photography. In this case, I did something similar to block light. That’s me up there holding a reflector to block light from a small bathroom window. Without it, harsh light was spilling into the bathroom.

bathroom


You can see in the image above how light from the window is hitting the left side of the frame and even parts of the sink. By cutting out the harsh light I was able to get an even exposure for the bathroom and blend it with the final image.


Final Image

Creative Theme Rooms in Vacation Homes


Star Wars Theme Room

I’ve seen a lot of theme rooms in vacation homes. In fact, I’ve written about them before:

Homeowners Get Creative With Interior Decor

This is How a Theme Room is Done!

But in the last year or so, I’ve seen homeowners really stepping up their game and pushing the creative envelope. With the renewed popularity of Star Wars, that franchise is popping up more and more in bedrooms. But I’ve never seen anything quite like the room above. Check out some more angles and note the R2D2 trash can in the bathroom.

Star Wars Theme Room
Star Wars Theme RoomStar Wars Theme Bathtoom


In another home the theme was Pirates. Think “Pirates of the Caribbean” ride at Disney World. I actually heard someone from Disney did some of the work in this room.

Pirate Theme Room

Pirate Theme Room
Pirate Theme Room
Pirate Theme Room
Pirate Theme Room

Of course Frozen theme rooms are still going strong. This one was unique with the changing LED light display.

I can’t wait to see what designers and homeowners will come up with next.

Good News! Professionals Are Obsolete!


Screen Shot 2016-04-16 at 6.07.27 PM.png

I ran across this article from a company giving its clients tips on the best resolution to upload images to its website and nearly fell out of my chair when I got to the bottom and saw the picture above with the caption: “…nor do you have to hire a professional photographer.”

Of course the image isn’t really a good example. The “before” picture is just a pixelated version of the “after” image which, I’m willing to bet was taken by a professional.

Let me share a few examples of what some of my clients have recently told me.

Client #1: “[My wife] and I can’t begin to tell you how happy we are with your
photographs. Working with a professional such as you is the only way to go.”

Client #2: “We went under contract the day after the photos were uploaded!!”

Client #3: After delivering images on a Wednesday night, the client told me on
Friday, “condo is under contract as of this morning.”

You may have already read a previous blog post I wrote which went viral and has been published all over the world about a house which languished on the market for 8 months before the real estate agent hired me to take new photos.

After Nearly 8 Months, Photos Help Sell Home in 8 Days

But hey, who needs to hire a professional, right? So the next time you need a lawyer, plumber, mechanic or doctor…just do it yourself!

Homeowners Get Creative With Interior Decor


In one of my recent posts I featured a home where the designer really got creative in some of the theme rooms. Well, I was equally impressed by a vacation home I photographed this month where the owners themselves added some very unique touches to the home. Take the New York City inspired loft complete with a taxi-cab pool table, subway signs, brick floor and full-sized wall mural of the skyline.

LoftLoft


Then there’s the outer space room. I don’t think I’ve ever seen silver sheets!

Space Room

In the bathroom, the cabinets look like control panels made by adding computer parts.

Cabinet


This is the “Around the World in 80 Days” room. Notice the sandbags on the bed to complete the hot-air balloon motif.

Hot Air Balloon Room

Then there are the treehouse and drive-in movie rooms with artificial grass.

Master Bed 4

Theater Room-1

And finally, who doesn’t need a boat in their room?

Master Bedroom


It’s fun to shoot rooms where a designer or owner has clearly put thought into the details of the decor.  From what I’ve seen in recent months, more vacation home owners are making an effort to get creative and have fun with their designs.


After Nearly 8 Months, Photos Help Sell Home in 8 Days


GetMedia.ashx

See this house? It languished on the Orlando market for 224 days.

It’s no wonder; with a photo like that who would want to come see it? A new realtor took over – one who understands the importance of professional photography for his listings. I shot it on February 28 and delivered the images the next day on March 1. On March 10 he told me a buyer had made an offer. So by my calculation, I believe the contract came in sometime between March 1 and March 9. To put it another way, after almost 8 months on the market, the home was under contract within 8 days after I took new photos.

Now I can’t say the photos alone sold the home; credit must be given to the Realtor. But I have no doubt the photos helped. Take a look at some before and after shots:

5271 Baskin St.-1

Living Room Before

Before

Living Room-1

After

For the living room shot, my original composition was a little tighter. The realtor asked me to pull back a little to show the hallway. I took his suggestion and I liked it. It opens up the room and  gives you an idea of the space.

Before shot of kitchen

Before

Kitchen-2

After

Dining Before

Before

Dining-2

After

This is the second angle of the dining room. The first was a head on shot but this one shows you the foyer and room off to the left.

Master Bed Before

Before

Master Bed 1

After

Bathroom Before

Before

Master Bath 1-2

After

Bedroom 2 Before

Before

Bedroom 2

After

Isn’t it clear how having good images can attract more potential buyers? I am always amazed how most Realtors refuse to pay for professional photos. It’s something I’ll be writing about more in a future post.

Color and Creativity Combine for a Fun Interior Shoot


My last post was about how a homeowner and designer came together for some fun and creative theme rooms. I recently photographed a home where the homeowner added a unique feature to the game and kids room.

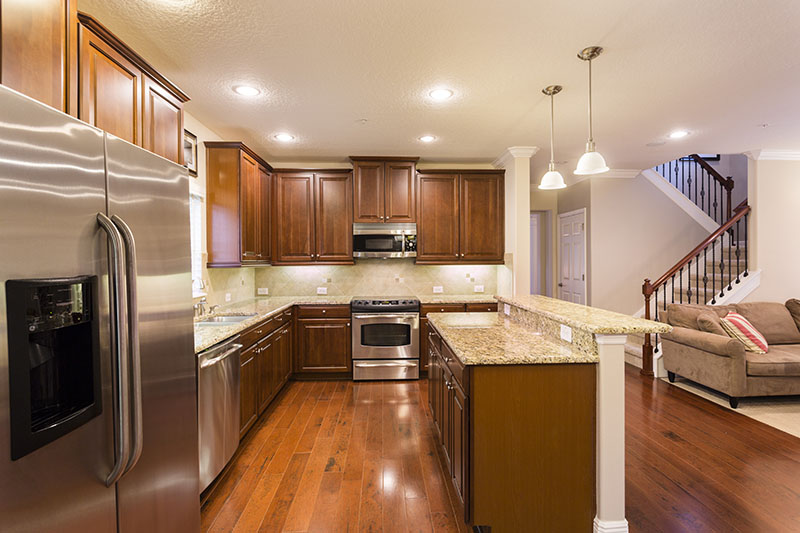
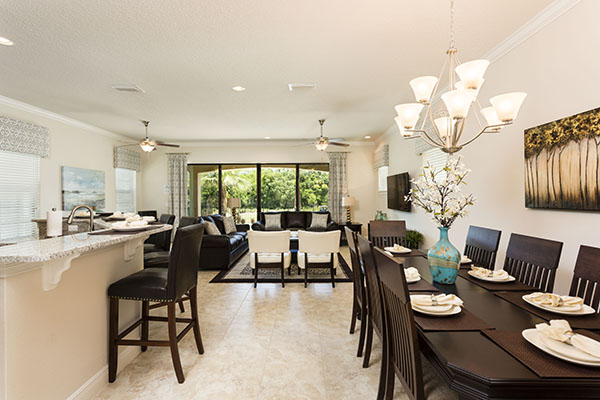
Before I get to that, I want to point out what the designer did with the interior. For a long time I have noticed how the decor and paint palette of a home can affect the way I feel about shooting it. When a home has dark paint and dark furniture, it makes the room feel small and drab. Never mind the challenges of trying to light a dark interior!  I find myself trudging through the shoot and not really enjoying it. Contrast that with bright colors or even neutral colors with accent colors thrown in. I find it puts me in a good mood and I really enjoy photographing the home. It almost makes it easier to light and that frees up my mind to get creative.


Living Room-3 Master Bed 1-1 Bedroom 5

Now check out what they did with the game room. It has a nuclear bunker theme complete with four gaming stations where the kids can play each other in multi-player games or individually if someone wants to play a different game.

_R5A2375 as Smart Object-1Game Room-3


Upstairs on the kids room is a Frozen theme (very popular).

Bedroom 8

The design in the ceiling is actually fabric connecting to the light fixture. But the coolest feature is this castle:

Bedroom 8 Decor-3


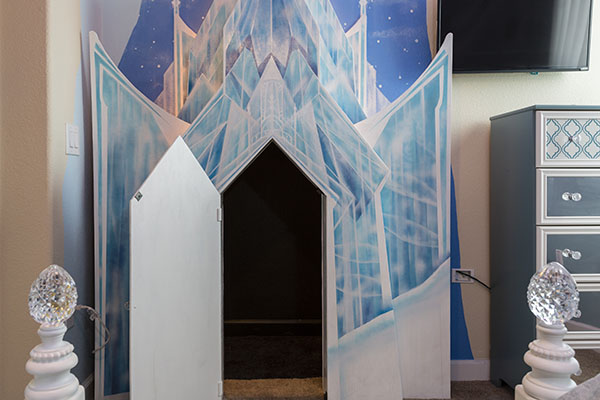
It doesn’t look like much until you open it up and find a little hide-away where kids can play.

Bedroom 8 Decor-4

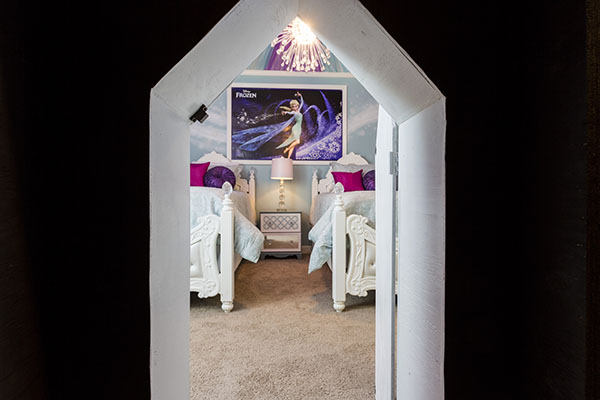
It actually connects to the Harry Potter themed room next door.


Bedroom 7-1 Bedroom 7-2


That closet door opens to the hide-away which connects to the Frozen room. Pretty cool, right!?

I’ve really seen designers steeping up their game and getting more creative. It certainly makes my job more fun. Check out the rest of the pictures here: http://bit.ly/1ugay0d

This Is How a Theme Room Is Done!


I photograph a lot of vacation homes and many feature theme rooms that might appeal the children in the families who are visiting. They can range from Disney themes to Harry Potter. Sometimes, it’s stuffed animals or wall murals or even the bedding. Often times, it seems like an afterthought and the room isn’t really tied together.

Just before Christmas, I shot a home where the designer clearly put a lot of thought into the theme rooms. Check out this Lego room where everything is awesome!

Lego Theme Room

Lego Theme Room


Then there’s the Frozen room:

Frozen Theme Room

Frozen Theme Room


I don’t know if you can tell in the second picture, but the carpet actually glistens with a glitter like material adding to the “snowy” effect.

Check out the entrance to the theater room:

Movie Room

Movie Room


Now that’s how a theme room should be done! It was a lot of fun to photograph this home. You can see the full gallery here: http://bit.ly/1KjtjVw

Using Black Flags for Interior Photography


In case you don’t know, a black flag is used in photography to absorb light and keep it from reaching your subject. It is the opposite of a reflector which bounces light onto your subject.

Interior photography is not unlike other types of photography in which you have a main subject, must compose carefully and place lights in the correct location. But it can present challenges too. Take a look at his picture:

bathroom

See that window? Sunlight is streaming in and bouncing off the floor which then reflects up into the bathroom. It’s typically bad practice to light a portrait of a person from underneath. It gives them that scary camp-fire-ghost-story look. Well, the same applies here. Look carefully at the shadows and you can tell the light source is coming from underneath. Even with flash, I could not make it looked balanced or pleasing. Here’s another look:

iPhone bathroom shot

You can see the sun bouncing off the floor and wall. I did not want to leave it as is and have people think that I lit the bathroom from underneath. I was stumped until I remembered that I always bring my 5-in-1 reflector with me. One of the sides is black. So I draped that over the spot where the sun was hitting:

IMG_1379

The black helped absorb the light and let me balance the ambient with flash for a more pleasing look. Here’s the final image:Final Bathroom Image

Notice the shadows cast by the bathtub faucet and light fixtures are less noticeable. The glare on the cabinet is reduced as is the brightness of the tile on the bathtub.

Most people may not think of using a 5-in-1 reflector for interior and real estate photography, but it’s just another photographic tool which helps to control the light.

Translating an Interior Scene from Camera to Screen


I was discussing my style and photographic vision with a homeowner recently. He complimented my work and I explained my goal is to translate what I see with my eye. That process is not easy. Behold what the camera saw in this scene:

Living Area
That’s about 1-to-2 stops overexposed. In other words, I had to disagree with what the camera thought was a “correct” exposure. That’s nowhere close to what I saw with my eyes. Here is the editing process I went through to get it to look natural:

Photoshop Screenshot


You can see it took 6 different layers to massage the image and get it to look like this:

Living Area


The room has a lot of dynamic range; from the brightness outside the sliding glass door to the dark furniture. As they say, when you get lemons, make lemonade.

Recent Acquisitions


Vide gear


In a recent blog post I mentioned that I recently invested in quite a bit of gear to start doing more real estate videos. I really want to increase the production value and make the videos cinematic. Here is some of the equipment I’ll be using:


1.) Westcott Spiderlite TD 6 Continuous Lighting Kit

2.)Manfrotto  535 Carbon Fiber Tripod with 502 Video Head

3.) Tether Tools Wallee iPad Connect

4.) Cinevate Atlas FLT 26 inch slider with vertical kit and counterbalance

5.) Manfrotto 494 mini ball head

6.) Rode Smart Lav

7.) Canon TC-80N3 Timer Remote

I plan to review each piece to let you know how it works and why I use it. So stay tuned for that.